Touch Keyboard: Difference between revisions
m (Reverted edits by Karam devka (talk) to last revision by Grimler) Tag: Rollback |
(extra-keys: document shift and scroll) |
||
| (One intermediate revision by the same user not shown) | |||
| Line 68: | Line 68: | ||
* ALT ("special key") | * ALT ("special key") | ||
* FN ("special key") | * FN ("special key") | ||
* SHIFT ("special key") | |||
* SCROLL | |||
* SPACE | * SPACE | ||
* ESC | * ESC | ||
| Line 112: | Line 114: | ||
<pre> | <pre> | ||
extra-keys = [[ \ | extra-keys = [[ \ | ||
{key: ESC, popup: {macro: "CTRL | {key: ESC, popup: {macro: "CTRL d", display: "tmux exit"}}, \ | ||
{key: CTRL, popup: {macro: "CTRL f BKSP", display: "tmux ←"}}, \ | {key: CTRL, popup: {macro: "CTRL f BKSP", display: "tmux ←"}}, \ | ||
{key: ALT, popup: {macro: "CTRL f TAB", display: "tmux →"}}, \ | {key: ALT, popup: {macro: "CTRL f TAB", display: "tmux →"}}, \ | ||
Latest revision as of 07:28, 8 November 2022
Use of keys like Alt, Ctrl, Esc is necessary for working with a CLI terminal. Termux touch keyboards do not include one. For that purpose, Termux uses the Volume down button to emulate the Ctrl key. For example, pressing Volume down+L on a touch keyboard sends the same input as pressing Ctrl+L on a hardware keyboard.
The result of using Ctrl in combination with a key depends on which program is used, but for many command line tools the following shortcuts works:
- Ctrl+A → Move cursor to the beginning of line
- Ctrl+C → Abort (send SIGINT to) current process
- Ctrl+D → Logout of a terminal session
- Ctrl+E → Move cursor to the end of line
- Ctrl+K → Delete from cursor to the end of line
- Ctrl+U → Delete from cursor to the beginning of line
- Ctrl+L → Clear the terminal
- Ctrl+Z → Suspend (send SIGTSTP to) current process
- Ctrl+W → Clear prompt before word (a word is a set of characters after a space)
- Ctrl+alt+C → Open new session (only works in Hacker's Keyboard)
The Volume up key also serves as a special key to produce certain input:
- Volume Up+E → Escape key
- Volume Up+T → Tab key
- Volume Up+1 → F1 (and Volume Up+2 → F2, etc)
- Volume Up+0 → F10
- Volume Up+B → Alt+B, back a word when using readline
- Volume Up+F → Alt+F, forward a word when using readline
- Volume Up+X → Alt+X
- Volume Up+W → Up arrow key
- Volume Up+A → Left arrow key
- Volume Up+S → Down arrow key
- Volume Up+D → Right arrow key
- Volume Up+L → | (the pipe character)
- Volume Up+H → ~ (the tilde character)
- Volume Up+U → _ (underscore)
- Volume Up+P → Page Up
- Volume Up+N → Page Down
- Volume Up+. → Ctrl+\ (SIGQUIT)
- Volume Up+V → Show the volume control
- Volume Up+Q → Show extra keys view
- Volume Up+K → Another variant to toggle extra keys view
Extra Keys Row
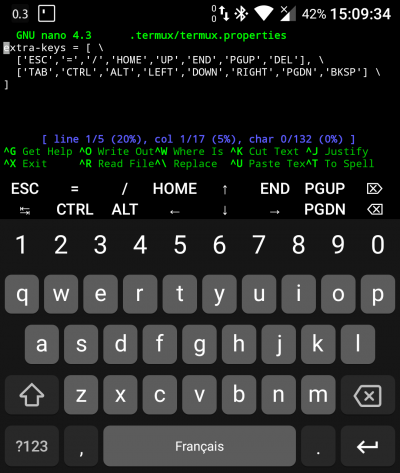
Termux also has an extra keys view which allows you to extend your current keyboard. To enable the extra keys view you have to long tap on the keyboard button in the left drawer menu. You can also press Volume Up+Q or Volume Up+K.
After Termux v0.66 extra keys row became configurable through file "~/.termux/termux.properties". If this file does not exist, you will need to create it.
After editing Termux.properties file, you need to reload Termux configuration by executing command "termux-reload-settings".
The setting extra-keys-style can be used to choose which set of symbols to use for the keys. Valid options are "default," "arrows-only", "arrows-all", "all" and "none".
extra-keys-style = default
Example configuration to enable 2-row (was in v0.65) extra keys:
extra-keys = [['ESC','/','-','HOME','UP','END','PGUP'],['TAB','CTRL','ALT','LEFT','DOWN','RIGHT','PGDN']]
The extra-keys definition itself can also be spread over multiple lines, if desired, by "backslash-escaping" the line feed at the end of each line, thus:
extra-keys = [ \
 ['ESC','|','/','HOME','UP','END','PGUP','DEL'], \
 ['TAB','CTRL','ALT','LEFT','DOWN','RIGHT','PGDN','BKSP'] \
]
Supported keys
Each key "entry" can be either a string (such as '|', '/' or '=') or one of the values listed below. These values are defined in ExtraKeysView.java, and the list of values (not including possible synonyms) is:
- CTRL ("special key")
- ALT ("special key")
- FN ("special key")
- SHIFT ("special key")
- SCROLL
- SPACE
- ESC
- TAB
- HOME
- END
- PGUP
- PGDN
- INS
- DEL
- BKSP
- UP
- LEFT
- RIGHT
- DOWN
- ENTER
- BACKSLASH
- QUOTE
- APOSTROPHE
- F1, F2, F3, F4, F5, F6, F7, F8, F9, F10, F11, F12
- KEYBOARD (Hide the keyboard)
- DRAWER (Open app drawer)
Each of the three "special keys" listed above should only be listed at most ONCE in the extra-keys definition i.e. do NOT have more than one CTRL key. Having more than one instance of any "special key" will result in a bug whereby those keys do not function correctly.
A note about backslash: this character has special meaning and you shouldn't use it directly to
define a key. Use 'BACKSLASH' instead, otherwise properly escape it - '\\\\'.
Advanced extra keys configuration
In Termux v0.95 extra keys configuration was extended with configurable popups. Popups keys can be triggered by swiping up on the respective keys.
Here is a syntax for key definition with popup:
{key: KEY, popup: POPUP_KEY}
and here is a syntax for a more advanced key:
{key: KEY, popup: {macro: 'KEY COMBINATION', display: 'Key combo'}}
Example of advanced extra keys configuration:
extra-keys = [[ \
  {key: ESC, popup: {macro: "CTRL d", display: "tmux exit"}}, \
  {key: CTRL, popup: {macro: "CTRL f BKSP", display: "tmux ←"}}, \
  {key: ALT, popup: {macro: "CTRL f TAB", display: "tmux →"}}, \
  {key: TAB, popup: {macro: "ALT a", display: A-a}}, \
  {key: LEFT, popup: HOME}, \
  {key: DOWN, popup: PGDN}, \
  {key: UP, popup: PGUP}, \
  {key: RIGHT, popup: END}, \
  {macro: "ALT j", display: A-j, popup: {macro: "ALT g", display: A-g}}, \
  {key: KEYBOARD, popup: {macro: "CTRL d", display: exit}} \
]]
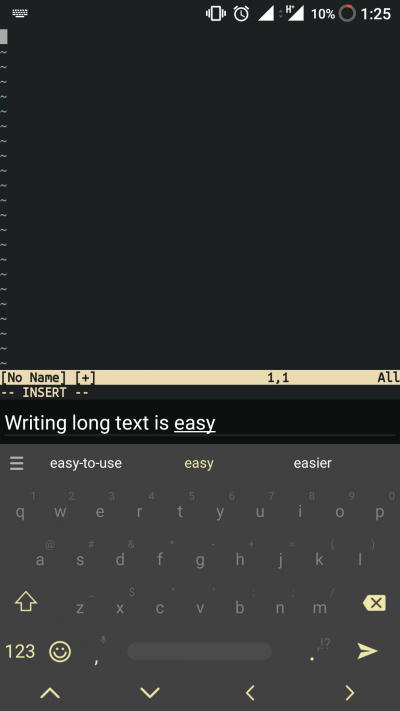
Text Input View
Terminal emulators usually do not support the advanced features of touch keyboards like autocorrect, prediction and swipe typing. To solve this, Termux has a text input view. Text entered in it will get pasted to the terminal. Because it's a native Android text input view, all touch keyboard features will work. To access the text input view you have to swipe the extra keys view to the left.

